Exploring the Software Bug Life Cycle (SBLC)
What is the Bug Life Cycle in Software Development?
The Bug Life Cycle in Software Development is akin to addressing issues in computer programs. Initially, we identify a problem and inform the team. They then verify if it’s a genuine issue. If confirmed, they rectify it, similar to repairing something. Following that, they ensure it’s genuinely fixed by testing. If everything checks out, they close the problem. However, if the issue resurfaces or isn’t resolved adequately, they revisit and work on it again. It’s like ensuring the software functions seamlessly.
Table of Contents: Bug Life Cycle
Understanding the Defect Life Cycle in Software Development:
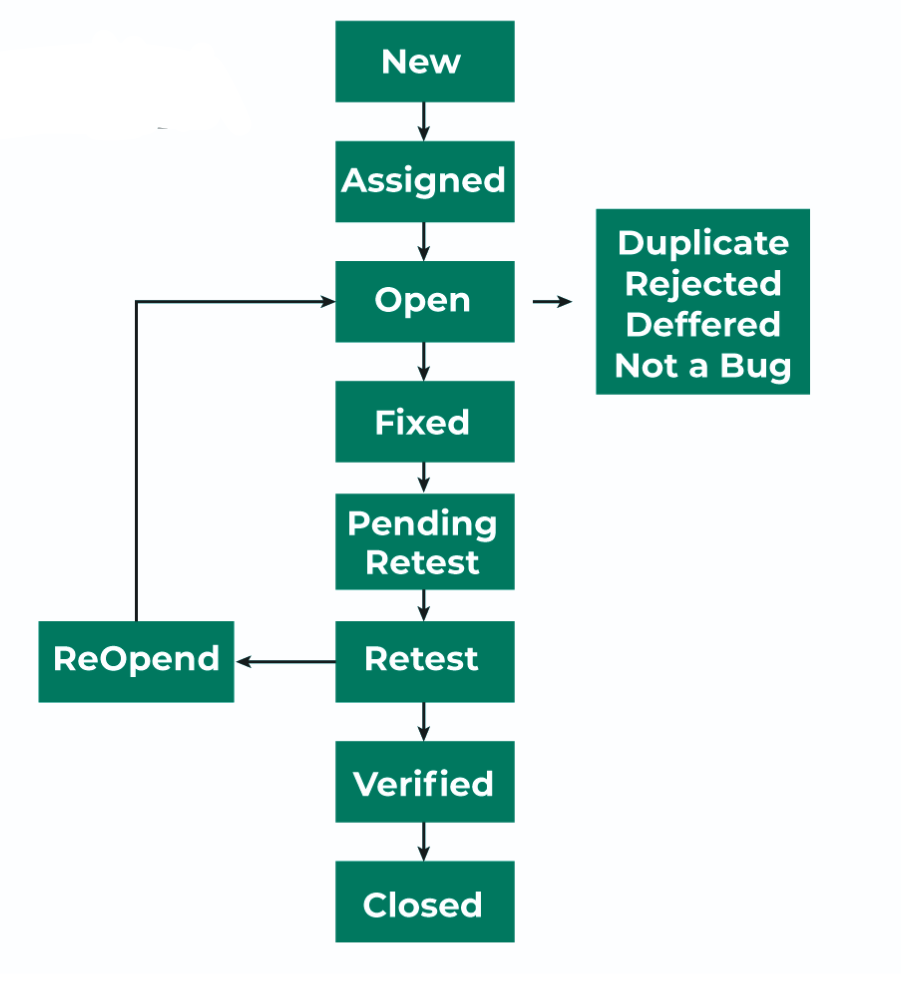
In the realm of Software Development, the Defect Life Cycle represents the various stages a defect or bug undergoes throughout its existence within a specific set of states. This journey, often termed the Bug Life Cycle, spans from the detection of a new defect to its ultimate closure by the tester.
It’s important to note that the path of the Defect Cycle can differ between organizations and projects. This discrepancy arises due to variations in development procedures, platforms, testing methods, and tools. The number of states a defect traverses also fluctuates based on the testing tools and processes employed during software testing.
The primary objective of the defect life cycle is to facilitate seamless coordination and communication regarding the current status of a defect. By doing so, it contributes to enhancing the efficiency of the defect-fixing process
Phases of Software Bug Life Cycle:
Establishing a solid fix cycle for the software bug life cycle can be a complex task, but certain entry and exit criteria provide essential guidelines for this critical process. These criteria act as crucial checkpoints to efficiently manage bugs and ensure the software remains robust and reliable. Let’s delve into these criteria and understand their significance in navigating the intricate world of software bug tracking.

New Status: A team member identifies a new bug, noting down all the details about what went wrong and how to reproduce the issue.
Open Status: A Quality Assurance professional reviews the bug to verify its authenticity. If confirmed, they label it as “Open.”
Assigned Status: The bug is assigned to a developer, who takes on the task of fixing the issue. The developer thoroughly investigates the bug’s details.
Valid/Invalid: The developer examines the bug report and determines its validity. If the bug doesn’t exist or can’t be replicated, it is marked as “Rejected.”
Rejected Status: If the bug doesn’t align with the plan or isn’t a genuine issue, the developer declares it rejected and closes the case.
Deferred Status: If a bug fix needs to be postponed, it is put on hold, patiently awaiting attention in a future update.
Duplicate Status: If a bug’s story has already been told, a new one is considered a duplicate and closed. Attention shifts to the original bug’s resolution.
In Progress Status: The developer rolls up their sleeves and starts the bug-fixing process, updating the bug’s status to “In Progress.”
Fixed Status: Once the developer successfully resolves the bug, they mark it as “Fixed,” signaling the completion of the mission.
Retest: The tester examines the supposedly fixed bug to determine if the glitch is truly resolved. If the fix is successful, it’s a “Pass”; otherwise, the bug makes a comeback (“Re-Open”).
Closed Status: When a bug fix passes testing, it’s time to celebrate – the bug is officially “Closed.” It’s like the end credits rolling on the bug’s story.
Re-Open Status: However, if the bug resurfaces, it’s back to the drawing board. The file is “Re-Opened,” and the process restarts.
Let’s outline a typical Defect Life Cycle for a tester, along with examples at each stage:
1. New:
- Description: The defect is identified and reported by the tester.
- Example: A tester discovers a login button that doesn’t function when clicked.
2. Open:
- Description: The development team receives and verifies the reported defect.
- Example: Developers confirm the issue and assign it for further investigation.
3. Assigned:
- Description: The defect is assigned to a developer to address the issue.
- Example: Developer John is assigned to fix the non-functional login button.
4. In Progress:
- Description: The developer starts working on fixing the defect.
- Example: John begins investigating the code to identify and rectify the login button issue.
5. Fixed:
- Description: The developer has implemented a fix for the defect.
- Example: John updates the code, and now the login button works as intended.
6. Retest:
- Description: The fixed defect is handed back to the tester for verification.
- Example: The tester retests the login button functionality to ensure it is now working correctly.
7. Verified:
- Description: The tester confirms that the defect is fixed and the solution is effective.
- Example: The tester verifies that the login button now functions properly.
8. Closed:
- Description: The defect is officially closed, and the status is updated.
- Example: The testing team closes the defect, and the login button issue is considered resolved.
Additional Scenarios:
9. Reopened:
- Description: If the defect reappears, it can be reopened for further investigation.
- Example: Testers find that the login button issue resurfaces after a certain user action.
10. Deferred:
- Description: Some defects might be postponed to be addressed in a future release.
- Example: A low-priority defect might be deferred to the next software update.
This Defect Life Cycle ensures a systematic approach to identifying, fixing, and verifying issues in the software, fostering collaboration between testers and developers to deliver a high-quality product.

